Sunday, June 7, 2015

Federal Side Table

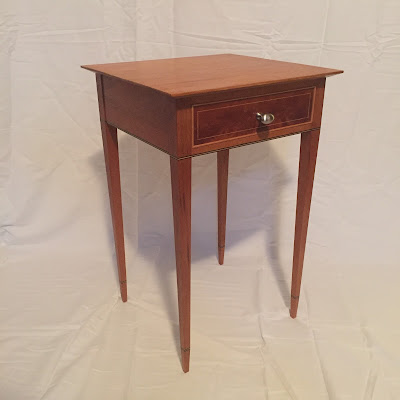
I have recently begun construction on a federal side table, inspired by Steve Latta in Fine Woodworking Magazine issue number 246.  This is an elegant side table with simple, yet striking inlay details.  It features a single drawer with a veneered face and cockbeading.  This will be my first project featuring banding, inlay, and veneer, so I am very eager to get involved with this.

I chose to build mine out of mahogany, so I bought two boards from my usual lumberyard.  One was a 5/4 board for the legs, and the other was 4/4, for the aprons and the top.  To begin the legs, I cut a section from the 5/4 board about an inch longer than the required length.  To get growth rings in the rift-sawn pattern, I took the stock for the legs out of the section of the board near the edges, where the annual growth rings are 45˚ to the face of the board.  I then proceed to cut the other components from the 4/4 board, also adding about an inch extra to the required length, and ripping them to rough width.
I then stickered the boards and let them sit all week.

The legs need to be the most accurate part of the project.  I also start with them so that I have a little extra energy and patience to ensure that the face is 100% flat and free of any twist, bows, or cups, and that the edge is perfectly square to the face.  Only then can I make a mark for the width using a panel gauge and saw it to width.


After I have ripped four legs from the 5/4 stock, I pick out my 4/4 stock and saw out rough length boards for the aprons, drawer front, and rails.  I will flatten each board in four steps:
  • Lengthwise passes down the center of the board with a jack plane
  • Traversing (perpendicular to the grain) to flatten the width 
  • Diagonal passes with a fore or jointer plane to flatten a larger surface area
  • With the grain to smooth out the board, and get rid of any tearout that resulted from planing against the grain
I take a jack plane and take passes down the center of the board on the heart side to get rid of any bow across the surface which typically happens to the heart side of the board.  This creates two points of contact for the plane during traversing.  Over time, the traversing process will bring the bowed surface down to flat.

Typically the heart side of the board is bowed
Lengthwise passes down the center of the board create a concave portion of the face which helps flatten the width of the board when traversing

After I have taken passes with my fore plane across the surface of the, and created a continuous surface free of the mill marks from the sawmill, I will then take passes diagonal to the surface. Diagonal strokes encourage a flatter board because the plane sees a longer length, and flattens a larger area than working just perpendicular and parallel to the grain.  The downside to diagonal passes is that half of them will be against the grain.  When working in difficult woods like curly maple, there can be massive tearout.  In this case, I usually use a toothed blade, or if I can, work perpendicular to the grain for as much as possible, and then take a high angle smoothing plane with the grain as the last step.


After I can't improve the surface anymore with diagonal passes, I check the board with winding sticks.  These point out any twist in the board.  Usually diagonal passes cure any wind in the board, but sometimes it isn't a perfect remedy.


From the photos you can see how winding sticks are placed on the board, and how sighting down them points out any twist in the board.  In this case, there is no twist.  If there was, there are two things I would do.  If the board was short enough, and in this case it probably would be, I would take a pass from high corner to high corner, until I was taking a continuous shaving.  Typically, if there is twist it will take a shaving at the beginning and end of the pass.  If the board was too long to do this, meaning the board was more than twice than length of my plane, I would take diagonal strokes with the plane in the high areas, and keep checking the board with winding sticks until the twist was eliminated.

The frame is held together with mortise and tenon joinery, and the legs get a double taper.  The first taper is marked out, and then I take short passes at the bottom end of the legs, and the gradually get longer towards the top.  Then the banding is inlaid on the bottom edge of the aprons and around the legs.  It is important to make all the measurements for the tenons from the bottom edge because the bottom edge banding should join line up perfectly with the banding on the legs.  A few inches up from the bottom end of the leg receives a cuff banding, and the secondary taper begins after the cuff.  I didn't film these processes, but here's what the finished leg looks like.


I then fitted the drawer front and sized the sides and back, and cut the dovetails for the drawer.  I then dovetailed the drawer.  After that I veneered the drawer front with crotch mahogany veneer 
and inlaid the stringing. 


 This is where I went wrong.  I waited to glue up the drawer until after the inlay and cockbeading was done.  What I should have done was glued up the drawer and fitted it precisely to its opening first, and THEN inlay the stringing and cockbeading.  The way I did it resulted in inaccuracy because removing 1/8 of an inch or so for the cockbeading meant that I was removing that width from the unfinished size, and the edges of the drawer had to be planed to fit after the beading was glued on.  The fit would have been much more precise and better looking if I glued the drawer together and fitted it before adding the inlay and cockbeading.

Drawer dovetails

The table got a finish of garnet shellac.  I had extra mahogany left over from this project which I used for the jewelry box, so I had seen how garnet shellac looked on it, and I loved it.  I used the same finish as the jewelry box on the table.  I brushed on eight coats of shellac, using #0000 steel wool in between coats.  I followed that up with two coats of paste wax.  The drawer front got a French polish.  It had been a long time since the last time I french polished something, so I was a little rusty, but the result was ok.  This was a great first table for me.  Although it could be considered my second if you count my workbench as my first.  It was a very detailed project which I loved because up until now most of my work had been shaker inspired, and fairly simple.  This project was a great introduction to the federal style, and I am looking forward to building more projects like this piece.


Handworks Photo Dump

I know I am several weeks late in posting about Handworks, but as promised, here it is.  The conference was a blast!  I met a lot of very interesting people and got my hands on a lot of tools that otherwise I would not have the opportunity to do so.  I also went to the Studley tool chest exhibit in Cedar Rapids.  I got to see the chest, workbench, and even met Don Williams, who organized the exhibit, and wrote the book Virtuoso: The Tool Cabinet and Workbench of Henry O. Studley.

Here are the photos from the exhibit:


 Some notable people who were at the conference were Carl Bilderback and Roy Underhill.  Mr. Bilderback sang the national anthem Saturday morning, and I must say, for a man of his age he has an amazing voice.  Roy Underhill made a presentation about the history of the axe, which surprised me by being almost like a stand-up comedy act.  The full presentation is on the Benchcrafted blog here.  I got to meet both of these influential men in person.  I had been waiting for a long time to shake their hands, and it was well worth it.


All in all, it was an amazing weekend.  I had been waiting impatiently for it for months, and it did not disappoint.  I am so glad to have been able to make it to this incredible event, and I doubt that there will be any other conferences that are anywhere near as spectacular as this year's.


Sunday, May 10, 2015

Finished Nightstands

Sorry about the lack of posts lately, I have been very busy and I have been pretty much buried in schoolwork the last few weeks.  I finally had some time to write a post on the work I have been doing recently.
The nightstands in their rightful places
I finally finished the nightstands.  Sorry I don't have any pictures of the process of building or finishing them.  I promise I will do better to document the process for the projects I do from here on out.
The tiger maple nightstand matches the maple bed frame
The tiger maple nightstand was a lot of work, but I learned a few things to make my next project with tiger maple a little easier.  As expected, the figure made it very difficult to handplane because anything less than 55˚ or so created a lot of tearout.  I needed to use my No. 6 with a toothed iron to prevent it.  Next time I work with tiger maple I will use my No. 62 Low Angle Jack Plane with a toothed iron, and I won't have to constantly switch blades on my No. 6.  To make matters worse, the boards kept cupping and twisting after I had dimensioned them.  I don't think I let the boards acclimate long enough.  A good rule of thumb for acclimation is cut your boards to rough length and width and let them sit for at least two weeks.  I only gave them a week or so. Lesson learned. I'll make sure to let my boards sit for much longer next time.


I used my favorite finish for tiger maple on this nightstand.  To prepare the surface, I scraped any areas with tearout, then raised the grain with some water and sanded to 400 grit.  This was an essential step because I used a water based aniline dye.  I used W.D. Lockwood's amber maple thinned down a fourth of the recommended concentration.  I brushed on five coats and wiped down the access as soon as possible so that only the figure soaks in the dye, followed by light 400 grit sanding.  After that, I ragged on two coats of a 2:1 blend of polyurethane varnish to mineral spirits, rubbing it down with #0000 steel wool. Somehow that always makes the figure really pop.  Then, I added a coat of paste wax.
Cherry nightstand and its companion, my cherry bed frame
The cherry nightstand went much smoother.  It is an easier wood to plane, and it's more stable.  I still stickered the boards after rough dimensioning them and let them sit for the proper two weeks to acclimate.  The one caveat to working with cherry is that you need to be aware of how brittle it is.  I had to make several repairs to blown or chipped out areas because cherry splits very readily.  This is something you need to be careful about with any species of wood, but cherry is even easier more susceptible to spelching than others.


I decided that I wanted to french polish this nightstand.  French polishing is a very labor intensive process, but it is very rewarding.  I prepared the surface by scraping any torn-out areas, and sanded to 400 grit, but there was no need to raise the grain this time, because I was not using a water based finish.  I will make a dedicated series of posts to explain the method, but here it is in short.  Step 1: fill the pores.  This can be done a few ways, just brushing on shellac, using pumice stone and shellac, or paste wood filler.  Step 2: body up.  After the pores are filled, move the applicator over the surface in a figure eight pattern across the wood.  You should add alcohol and shellac to the applicator in equal amounts.  Step 3: spirit off.  After the shellac has cured, use a fresh applicator doused in alcohol to remove any oil on the surface of the finish.  Or, like me, you can cut corners and just wipe down the surface with mineral spirits.  I do not have the room to make a more detailed lesson on french polishing right now, so I suggest that you search the internet and Youtube to get a more in-depth explanation of the process, and soon enough I will post my own method here on the blog.  

So that's what I've been up to lately.  I will be back soon to update you all on what else I am working on.  On Thursday I am flying to Amana to go to Handworks.  It looks like a great line up of demonstrators there, and an intriguing presentation by Roy Underhill on the axe.  Last but not least, as you all have probably heard, the Studley tool chest is on exhibit nearby.  It sounds like it's going to be a once in a lifetime opportunity to see it, so I am very lucky to be able to go and see it.  I am super excited and I will report back with news on the weekend. Happy woodworking!

Monday, March 23, 2015

The Best Customer Service in the World

A few days ago, I was sharpening a scraper on my fantastic Ohishi waterstone, and I decided I needed to flatten it.  My method of flattening a stone is to use a diamond plate, but even though I use running water from the sink to lubricate the two stones, the super fine 10,000 grit side of my combo stone always sticks to the diamond plate.  To unstick the stone, I usually twist the stone sideways to reduce the surface area of the stone, thus reducing the friction.  This time, though, I lifted up the stone accidentally.  To my dismay, I realized that half of the stone had broken off, and the other half was still clinging to the diamond plate.  I am definitely not trying to make a point about these waterstones being cheaply made or of poor quality, and they are definitely not either of those.  In fact, they are the best sharpening media I have ever used.  I just happen to be the one idiot who managed to break a $120 sharpening stone.
Here's what a $120 rock looks like

I immediately emailed Lie-Nielsen Toolworks, whom I had bought the stone from in July.  I know that if I have a problem with tool I have bought from them (though problems rarely arise), they will not hesitate to replace or fix a damaged tool.  I wasn't sure how they would handle a situation like this, because they do not make the Ohishi waterstones.  To my amazement, they sent me a brand new 10,000/3,000 grit waterstone, completely free of charge.  I didn't even have to pay for shipping!


The new waterstone
This brief post is my way of thanking the amazing people over at Lie-Nielsen Toolworks in Warren, Maine.  Just one email or phone call with their customer service can show you how much this company values its customers.  I am so glad that there are still companies like this in the world, as they are beginning to disappear.  I hope this story makes some of you out there who are on the fence about buying one of their tools because of the higher price reassured that the cost is well worth it, because I know that the Lie-Nielsen difference not only lays in the tools themselves, but also with the people responsible for producing them.

Speaking of purchases, I just had one of my own delivered just last Friday.  I first heard of Lie-Nielsen on the DIY Network show Cool Tools, where they showed the LN No. 62 Low Angle Jack Plane being used by the expert hands of Deneb Puchalski, whom I would eventually meet in person. I had not yet experienced the joy of handplaning, but this was the tool that made me want to try it. Five or six years later and I was finally able to own the tool that opened me up to the world of hand tool woodworking, and it is even better than I expected.  

I will use the 62 mainly as a dedicated shooting board plane, and I made a new shooting board for just that job.  Perfectly square every time, and effortless to use!
I also needed a shoulder plane, and the LN Large Shoulder Plane really had an appeal that set it apart from other shoulder planes like Veritas and Clifton.  It works just as you would expect a Lie-Nielsen tools to perform, and is a great addition to my tool chest.

The 62 and Large Shoulder Plane


Tuesday, March 3, 2015

Some Past Projects


Since progress on the nightstands is a little sluggish, I thought I would post some pictures of projects I have completed in the past.

The first project I made start to finish was a jewelry box from mahogany and poplar with cherry accents in the interior.  I had a lot of fun making this, the dovetails turned out great and it was my first experience with inlaying hinges.  A special thank you goes out to Tim Lovett of Lie-Nielsen Toolworks who helped me decide what to do about the bottom of the inside tray.  I was worried that a solid piece of wood would present a problem during the course of expansion; however,  he assured me that, since I was building the box in the summer, the bottom would only get smaller, so it would not be a problem.

The deep red mahogany is a strong contrast against the greenish-white poplar.
The houndstooth dovetails of the tray.  It sits on dividers that rest in stopped dados in the main case.

I was too busy to complete any projects during the last school year, so it was long time before I built another one. Looking ahead to the summer, I decided to build a new workbench. I had become fed up with the one I bought a few years earlier from Harbor Freight (what a mistake that was), so I decided I deserved to make a new one. I wanted to build a split-top roubo, because it is perfectly suited to hand work, and could easily be used for occasional power tool work. I began making preparations for it in the spring. What an investment that was! I built this bench almost entirely by hand, including ripping the sixteen-quarter poplar legs and eight- and six-quarter ash for the top. I knew I was going to struggle with flattening the top with my number six fore plane, so I called up my friend Tommy MacDonald, and he took time out of his day to invite me over to his shop in Canton to run the two top sections through his powerful planer.  I would estimate that he save me five to six hours of work that I would otherwise have had to do by hand.  He did all that for me completely free of charge, which really shows how selfless he is.  I don't think I will ever be able to repay him for that, but he has really inspired me to do even better work on my bench and to be a better person.  The Benchcrafted vises are so sweet. All it takes is one quick spin of the wheel or tommy bar and the vise cinches down tight. I don't think I even needed to line the jaws with leather, but why the heck not?

I can never take a good photo in my shop.
I toothed the benchtop to give it some extra grip.

The first project I completed on my new bench was a cherry bedframe with a tiger maple frame-and-panel headboard.  This is the biggest piece of furniture I have built by far, which made for some workholding challenges.  The long rails are, I believe, seven inches longer than the length of my benchtop, so I clamped the boards down and took stopped shavings with my handplanes and scraped and sanded to blend any spots where the shavings didn't quite overlap.  The tiger maple panels were resawn from an eight inch wide eight-quarter board.  To do this I took the boards to my high school, which has a bandsaw, and it made quick work of this hard wood.  The finish for the cherry frame was rather straight forward.  Two coats of a 2:1 mineral spirits to varnish blend and a quick coat of wax.  The tiger maple was much trickier.  I used a mixture of W.D. Lockwood's Golden Amber water-based dye that was thinned down a twelfth of the recommended concentration.  I used several thin coats and wiped away the excess as soon as possible.  This allowed me to really highlight the figure, because it absorbed much more of the finish compared to the straight grain.  I followed that up with three coats of the 2:1 mineral spirits to varnish blend that I used on the frame.  This really made the grain pop.  I then used a coat of wax over each panel.  It is best to do the finishing on panels BEFORE they are set into their frame.
A good view of the entire frame. 
A close up of the headboard.

In the next few days I should have a post updating you all on the progress of the nightstands, so stay tuned.  Happy woodworking!


Sunday, March 1, 2015

Welcome to the Blog!

Hi there,

My name is Danny Spatz and I am a passionate woodworker just like you.  I will use this blog mainly for four reasons. The first and most important is to update readers with my adventures in woodworking, such as current projects that I am working on.  Second is to create an archive for things like finishes I used on a specific project that I can reference if I choose to repeat it at some point in the future.  The third reason is to create a virtual résumé for potential employers or people interested in making a commission.  Finally, I have heard that starting a blog is a great way to improve your writing and developing a voice characteristic to yourself, and that is one more thing I wish to achieve from this blog.

Here's a photo of me at 15 years old with my first project, a jewelry box.  

To tell you a little more about myself, I have been woodworking almost entirely by hand for about two and a half years now.  I am lucky to live in a time where just about anything can be learned from the internet, and I have taken advantage of that.  Most of what I know I have learned from the internet, but I have taken a few classes taught by some of the most well known teachers such as Phillip C. Lowe, Christopher Schwarz, and Bob van Dyke.  I am also a subscriber to Popular Woodworking and Fine Woodworking magazine.  I do all of my work in my small basement shop with the decent assortment of tools I have acquired with the money I have earned by lawn mowing for my neighbors and more recently, lifegaurding at a local pool, as well as a most gracious donation from Mr. Carl Bilderback, who sent me a router plane after reading about me on Mr. Schwarz's Lost Art Press blog, you can read the article here. I am most grateful to both of them for their help in allowing me to further develop my skills.


Speaking of current projects, I am working on a set of two nightstands for my bedroom, which I share with my older brother.  As you might have guessed we will each get one.  One is made of Tiger Maple and the other, which is destined to be mine, is made of Cherry. I will update you in the progress I make in the coming posts.

Here is the current process on the nightstands.  The tiger maple one is nearly done, all it needs is for the profile on the plinth to be cut out and the finish to be applied.  The cherry one is not quite there but I'm chugging along just fine.

Blogs can be wealth of information, but also a source of controversy.  That is why I will do my best to write about my methods of work while avoiding the much disputed topics such as pins or tails first dovetailing, just about anything concerning the topic of sharpening, or the use of western style or japanese style tools (though you can probably figure out which one I use from the picture above). I will do my best to provide accurate, grammatically correct, information in my posts, but do let me know if I have made a mistake, politely if you will.  Talk to you soon and happy woodworking!