I chose to build mine out of mahogany, so I bought two boards from my usual lumberyard. One was a 5/4 board for the legs, and the other was 4/4, for the aprons and the top. To begin the legs, I cut a section from the 5/4 board about an inch longer than the required length. To get growth rings in the rift-sawn pattern, I took the stock for the legs out of the section of the board near the edges, where the annual growth rings are 45˚ to the face of the board. I then proceed to cut the other components from the 4/4 board, also adding about an inch extra to the required length, and ripping them to rough width.
I then stickered the boards and let them sit all week.
The legs need to be the most accurate part of the project. I also start with them so that I have a little extra energy and patience to ensure that the face is 100% flat and free of any twist, bows, or cups, and that the edge is perfectly square to the face. Only then can I make a mark for the width using a panel gauge and saw it to width.
After I have ripped four legs from the 5/4 stock, I pick out my 4/4 stock and saw out rough length boards for the aprons, drawer front, and rails. I will flatten each board in four steps:
- Lengthwise passes down the center of the board with a jack plane
- Traversing (perpendicular to the grain) to flatten the width
- Diagonal passes with a fore or jointer plane to flatten a larger surface area
- With the grain to smooth out the board, and get rid of any tearout that resulted from planing against the grain
I take a jack plane and take passes down the center of the board on the heart side to get rid of any bow across the surface which typically happens to the heart side of the board. This creates two points of contact for the plane during traversing. Over time, the traversing process will bring the bowed surface down to flat.
 |
| Typically the heart side of the board is bowed |
 |
| Lengthwise passes down the center of the board create a concave portion of the face which helps flatten the width of the board when traversing
After I have taken passes with my fore plane across the surface of the, and created a continuous surface free of the mill marks from the sawmill, I will then take passes diagonal to the surface. Diagonal strokes encourage a flatter board because the plane sees a longer length, and flattens a larger area than working just perpendicular and parallel to the grain. The downside to diagonal passes is that half of them will be against the grain. When working in difficult woods like curly maple, there can be massive tearout. In this case, I usually use a toothed blade, or if I can, work perpendicular to the grain for as much as possible, and then take a high angle smoothing plane with the grain as the last step.
After I can't improve the surface anymore with diagonal passes, I check the board with winding sticks. These point out any twist in the board. Usually diagonal passes cure any wind in the board, but sometimes it isn't a perfect remedy.
 
From the photos you can see how winding sticks are placed on the board, and how sighting down them points out any twist in the board. In this case, there is no twist. If there was, there are two things I would do. If the board was short enough, and in this case it probably would be, I would take a pass from high corner to high corner, until I was taking a continuous shaving. Typically, if there is twist it will take a shaving at the beginning and end of the pass. If the board was too long to do this, meaning the board was more than twice than length of my plane, I would take diagonal strokes with the plane in the high areas, and keep checking the board with winding sticks until the twist was eliminated.
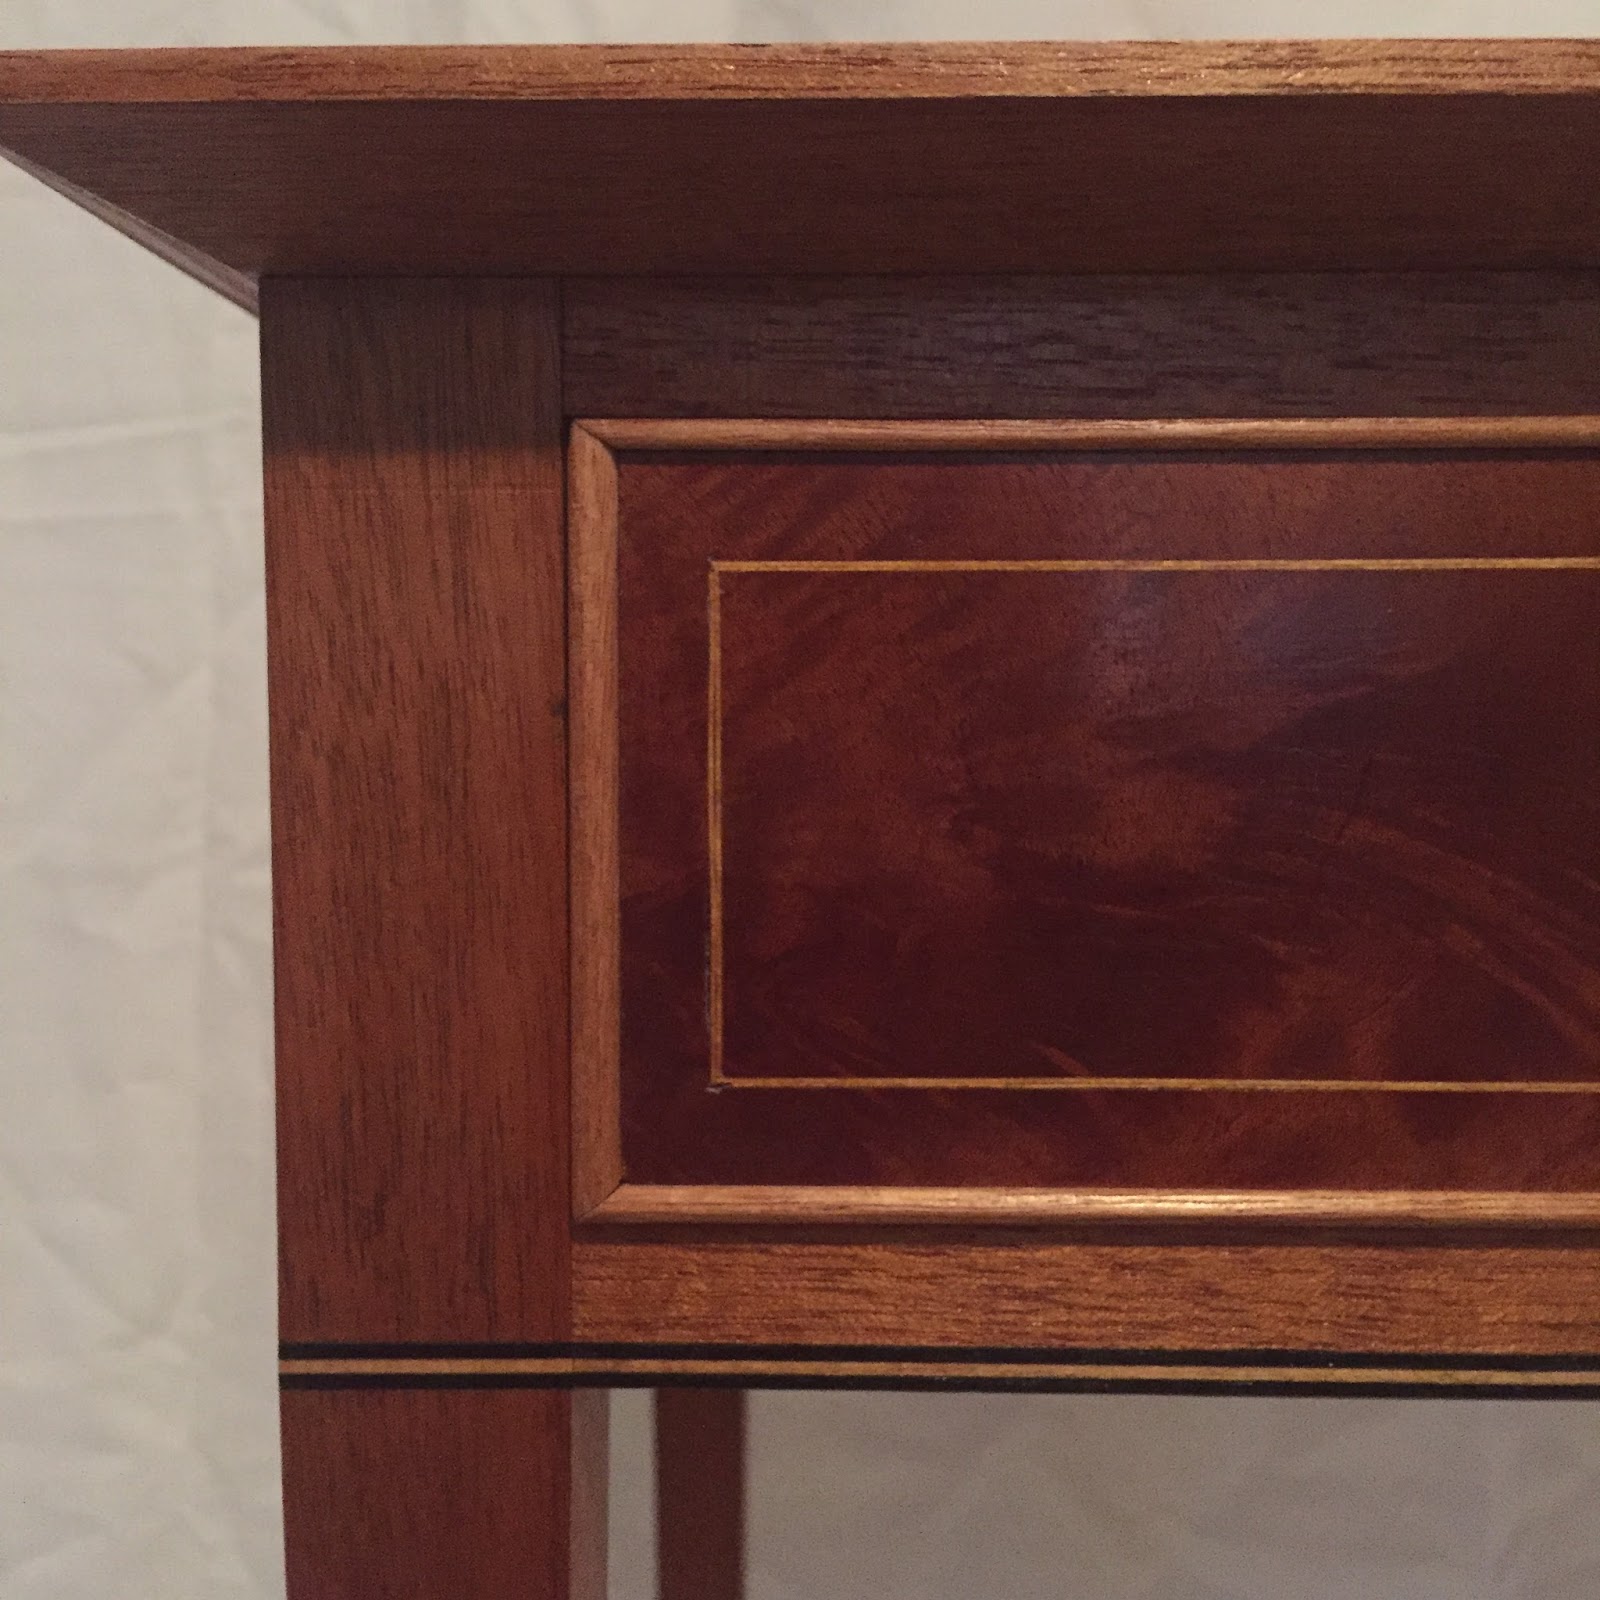
The frame is held together with mortise and tenon joinery, and the legs get a double taper. The first taper is marked out, and then I take short passes at the bottom end of the legs, and the gradually get longer towards the top. Then the banding is inlaid on the bottom edge of the aprons and around the legs. It is important to make all the measurements for the tenons from the bottom edge because the bottom edge banding should join line up perfectly with the banding on the legs. A few inches up from the bottom end of the leg receives a cuff banding, and the secondary taper begins after the cuff. I didn't film these processes, but here's what the finished leg looks like.
I then fitted the drawer front and sized the sides and back, and cut the dovetails for the drawer. I then dovetailed the drawer. After that I veneered the drawer front with crotch mahogany veneer
and inlaid the stringing.

This is where I went wrong. I waited to glue up the drawer until after the inlay and cockbeading was done. What I should have done was glued up the drawer and fitted it precisely to its opening first, and THEN inlay the stringing and cockbeading. The way I did it resulted in inaccuracy because removing 1/8 of an inch or so for the cockbeading meant that I was removing that width from the unfinished size, and the edges of the drawer had to be planed to fit after the beading was glued on. The fit would have been much more precise and better looking if I glued the drawer together and fitted it before adding the inlay and cockbeading.

Drawer dovetails
The table got a finish of garnet shellac. I had extra mahogany left over from this project which I used for the jewelry box, so I had seen how garnet shellac looked on it, and I loved it. I used the same finish as the jewelry box on the table. I brushed on eight coats of shellac, using #0000 steel wool in between coats. I followed that up with two coats of paste wax. The drawer front got a French polish. It had been a long time since the last time I french polished something, so I was a little rusty, but the result was ok. This was a great first table for me. Although it could be considered my second if you count my workbench as my first. It was a very detailed project which I loved because up until now most of my work had been shaker inspired, and fairly simple. This project was a great introduction to the federal style, and I am looking forward to building more projects like this piece.
     |
This comment has been removed by a blog administrator.
ReplyDeleteThis comment has been removed by a blog administrator.
ReplyDeleteThis is a great inspiring article.I am pretty much pleased with your good work.
ReplyDeleteFurniture Stores In Denver
Furniture Parker
Rustic Dining Table And Chairs
Hello, I appreciate your work to make this wooden table, but I would not be able to do that. My wife and I bought La forma furniture. They look very good in the showroom, and La Forma is also known for the durability of its chairs and other
ReplyDelete